Showing posts with label Side Dishes. Show all posts

Friday, August 31, 2012

Broccoli and Arugula "Cupcakes"

So it was a fairly normal Thursday at my house except for the nasty ragweed allergy season that has struck, oh and the poison ivy.  Yeah.  Poison freaking ivy.  I had gone to pick up the children from school and stopped by my favorite farm for my last load of veggies before Elizabeth went on vacation ***insert sadness***.

Anyways!  I went home, washed everything and started cooking my face off.  Not sure what the hell phase the moon was in but I started making 1 new dish that turned into 3 new dishes.  Alright, it could be the undiagnosed ADHD that I probably have but, whatever.  That's when it happened.  A knock at the back door, my dog going nuts and my neighbor, Kim, standing there with an enormous basket of veggies!  Obviously I welcomed her, and all the kale a girl could possibly want, into the house...and poured her a glass of wine.  I may or may not have then poured myself a vodka tonic but let me not get sidetracked.  Elizabeth, the best farmer on the planet, had sent her to me bearing gifts!  And what gifts they were!  I usually like going with one new recipe at a time but with everything staring me in the face I couldn't resist.  I had seen an intriguing recipe on Pinterest (shocker) for these baked cheddar broccoli rice cups and while I didn't have all the ingredients, it did get me thinking.  Love that!  This is my version of what came of it and I must say, it's amaze-balls!
This photo could totally be better but Kim insisted this needed to be my next post!  LOL!

Here's what you need:

  • 1½ cups Brown Jasmin Rice, cooked
  • 10 oz Broccoli, frozen or roughly 2 cups fresh, blanched.  I used fresh and chopped it.
  • 1½ cups Arugula, chopped
  • ¾ cup Cheese, ½ cup Monterey Jack and ¼ Parmesan
  • 2 large Eggs, beaten
  • ¼ cup Trader Joe's Red Pepper Spread with Eggplant, trust me...you need this in your life.
  • 6-8 sprigs Thyme
  • Muffin tin, regular or large
Preheat your oven to 350℉.
Sooo, throw all of it (except the Parmesan!) in a bowl large enough to get a good mix on things.  Seriously. All I ask is that you do spend the time to really incorporate the ingredients.  Then once the ingredients are all mixed thoroughly, divide your batter into your muffin tin.  They won't be rising so just fill those buggers to the tipity top.  Then top the "cupcakes" with your Parmesan.

Now, I used the large muffin tin and this made six FULL "cupcakes".  Next time I won't be so short sighted and I will double the recipe.  It was that big of a hit.  You all know how I feel about recipes that all 3 of my lovelies enjoy!  Once they are filled, pop them in the oven for 30 minutes or so.  I would start checking them at 20 minutes since the old cooker can vary dramatically from one to another.  I served them with some sauteed trombocino squash and onions but a salad and nice bread would work great here as well.  I liked that the Parmesan was nice and golden and...damn, now I want to make these again!

And don't you worry...the other two recipes will be coming your way soon!  ❤

Bon Appetit...it's time to eat!
Kathi

Thursday, July 12, 2012

Mushroom and Pea Risotto

Let me warn you, I'm not starting this post the way I necessary should...but I never said I was a good rule follower. 
I used to really suck at risotto.  Badly.  My first attempt (probably 12 years ago) was delicious and my husband looked forward to the dish in the future.  It rarely happened ever again, it was always a hit or miss.  I didn't know why and it really pissed me off.  Over the years I have tortured him with "experiments", always with another dish on deck in case the risotto didn't pan out, pun intended.  Over the past year or two I have always managed to make risotto that everyone, all 5 of us, has raved about.  I think I have figured out what the problems where and they weren't that difficult.  Risotto is really a simple dish as long as you follow some easy steps.  I don't lie about these things! 
So my oldest baby (she's 10, whatever) had to have 4 teeth removed and needed a soft diet for a few days.  She requested a risotto dish and a Frittata Dish.  No problem.  Anything for my poor cherub!  This was what I came up with and everyone was thrilled!  Not an easy feat for a family with three girls, albeit amazing girls! 
 
Here's What You Need
  • 3 Tablespoons Olive Oil
  • 1 Tablespoon Butter, unsalted
  • ½ Large Onion, Chopped
  • 2 Large Portabella Mushrooms, Chopped
  • 1 Cup Arborio Rice
  • ½ Cup White Wine, Pinot Grigio is my "go to"
  • 5-6 Cups Vegetable Broth
  • 3½ Ounces Goat Cheese
  • ⅓ Cup Parmesan Cheese, I used my microplane
  • Zest of ½ Lemon
  • 1 Cup Frozen Petite Peas
  • Salt and Pepper, always
Start with the usual suspects...Olive Oil and Butter, in a large saute pan and the onions.  Cook them down for 2 minutes or so with some salt and pepper, then add in the mushrooms.  This should all cook for about 5 minutes until there is some nice color on them and then add in the rice.  Stir it around and get it coated in the mixture completely for 2-3 minutes.  Don't skimp on this step.
Now is the time to add in the wine!  I measure out the correct amount for the pan and then have a glass handy to fill for my own personal consumption.  It's my favorite step.  Don't judge me. 
Stir the rice until the wine is absorbed then it's time to add in the the broth.  Now I know I wrote "Vegetable Broth" on the ingredients list but please, feel free to use whatever you like.  I have a standard size ladle (not the over sized version) and add in two ladle fulls.  Stir, stir, stir.  Once it has been absorbed by the rice, add in two more.  I don't sit over the pan stirring the whole time, but quite often.  I am always close by and keeping an eye on what's happening.  This whole process takes about 25-30 minutes, it always varies for me, just like the amount of broth does.  I haven't figured this one out...but who cares.  It's delicious.
Risotto should be al dente.  Stick a spoon in that pan and try it at around 22 minutes to see where it is, you may have to add one more ladle and try it again in a few minutes.   Good?  Now add in the peas.  I like the petite peas rather than the regular ones but again, use what you have.  Stir it around then add in the cheese.  I break the goat cheese up to melt it a bit easier then once that's incorporated add in the Parmesan.  Stick another spoon in and try it again.  Check for salt at this point.  I never add too much in the beginning because the cheese tends to have a good amount of salt.  If it needs it, add it...if it's good, just enjoy it.
I serve this with roasted vegetables or grilled shrimp.  Sometimes I use it as a main dish and sometimes a side.  It's quite versatile in that way.  
Today because of "Toothless" I roasted  2 zucchini,  2 yellow squash and ½ of a sliced onion with olive oil, salt, pepper, 1 teaspoon of dried rosemary on 400℉ then add in  ¼ cup of both basil and flat leaf parsley.  It was perfect for her and scrumptious for the rest.
Bon Appetit...it's time to eat!

Thursday, April 26, 2012

Grilled Stuffed Zucchini

I was having some of my favorites, Bianca and Paula, come over for a "Mama Lunch" today,  and decided I was going to make them my personal taste testers and help me out with this blog.  If you're a Mother I would hope you know what a Mama Lunch is...for those of you who are newly "Mama'd" or not "Mama'd" let me explain.  A Mama Lunch involves alcohol.  Wine.  Beer. Vodka.  Whatever.  We get together for a midday meal, laugh, blow off steam, talk about our kids (or anything but) and have some cocktails.  Don't judge us.  I also do these lunches with non-Mama's and have an equally great time, yet I still call it a Mama Lunch.  I don't like change.  Deal with it.
So this recipe was inspired by an appetizer The Husband and I get from one of our few favorite chain restaurants, Burton's Grill.  It's as copy cat as I can get it and it's amazing if I do say so myself.  It can be an appetizer, side dish or light lunch with a salad.  Love the versatility!  You can feel free to use a jar sauce or your favorite recipe.  If you don't have a favorite, try mine.  It's pretty freaking good My Version of Tomato Sauce, if I do say so myself.
Sadly only Paula was able to make it, one of Bianca's babies ended up being sick.  Poor baby...see why we need Mama Lunches?!?   On the upside...I have another serving sitting in my fridge right now waiting for me to devour it.  Is that wrong?  Yeah, a little bit.  It's just so damn good!


Here's what you need

  • 1 zucchini per person you are feeding
  • Alouette, Garlic and Herb Cheese
  • Sauce, jarred or homemade
  • Mozzarella, shredded, 1/4 cup per dish
First start your grill and get it smoking hot.  I have gotten pretty comfortable with my grill this spring season...not sure why I have been afraid of it until now?  I'm bad ass.  LOL!
You are going to need to cut your zucchini lengthwise, I can usually get 4 good middle slices out of mine.  The ends wind up being my little snacky snack!

I put the slices into a zip top bag and add salt, pepper and a few tablespoons of olive oil.  Zip it up and make sure you take most of the air out then rub the bag in between your hands to spread everything around all nice.  
Lay the slices out all pretty on the grill and shut the cover.  

Leave them alone for 2-3 minutes to get some delicious grill marks on them...I love this part!  Flip them over and do the same thing to the other side.  

Once they are gorgeous and all grill marked put them on a plate or cookie sheet to cool before stuffing them.  

I used a cutting board to assemble mine.  Preheat your oven to 375˚ and add a few tablespoons of sauce to the bottom of your oven proof dishes.  This prevents the zucchini from sticking and later when the zucchini is sitting in your stomach you have something to dip your bread in.  Always think to the future people.  Side note...yes that is a Ziplock bag with my sauce in it, and yes, I label it "Mama's Sauce".  Too funny!

Lay a zucchini slice down and place 1 1/2 teaspoons of the Alouette cheese at the end of the slice.  

Then roll it up in a cute little package.  Ignore the red spots on my fingers...it's permanent marker so you may see it again!  LOL! 

and place it in your oven proof dish...oh happy day!  It looks good already doesn't yet?  Just wait.
I put a few more tablespoons of my sauce on top of the goodness that is the stuffed zucchini

and then pile on the Mozzarella.  Grated Parmesan or Fontina would also be good here.  OMG cheese! It looks insanely good even though the pic is upside down.  I tried fixing it.  And gave up.  

I covered the dishes individually and placed them on a cookie sheet.  It made it easier to get them in and out of the oven.  After 20 minutes check to see if they are bubbly and the cheese is melted.  If you're good to go, leave the foil off and blast them under the broiler for a minute to brown the cheese up a bit.
Mmmmmmm cheesy goodness...that's it!  I'm going back down to the fridge and eating that last serving!  Sorry Bianca!
Bon Appetit...it's time to eat!  Again.

Tuesday, April 3, 2012

Yukon Gold Latkes with Zucchini

I had spent a leisurely Saturday afternoon working on a blog post for Zucchini Pasta and lost track of time.  Does that ever happen to anyone else?  I glanced at the time and it was 5:20 pm and I hadn't planned anything (so unlike me).  Thankfully I had clicked on the "publish" button and I was geared up for one of those magical moments of pulling something right out of my ass.
I walked into my pantry in a not too obvious panic so as not to alarm the children and find some Yukon Golds.  I thought maybe a hashbrown?  They take longer than I had to brown up and get crispy the way everyone likes.  Balls.  But what if I did a smaller version and made a latke?  I have onions and as a bonus I also have zucchini!  This could work!

My girl friend, Terri, had walked me through making latkes on numerous occasions but I had never made them on my own before.  Who knew that I had retained all that information!  Really all you need as far as tools go for this recipe is a box grater, clean hands and a large saute pan.  Check, check and check!
And please don't look at the eggs in this picture, the middle child loves an over hard egg.  Gag.

Here's what you need (food wise):
  • 4 medium sized Yukon Gold potatoes, grated
  • 1 medium sized Onion, grated (Vidalia is what I always have, therefore use)
  • 1 medium sized Zucchini, also grated
  • 2 eggs, beaten (HA!  Not grated!)
  • 1 teaspoon granulated Garlic
I grated all of the potatoes and once they were done put them in a bowl of cold water, it helps to crisp them up at the frying stage.  It also works for French Fries too!

Here's my other trick...get a cookie sheet and cover it with tin foil, then put a wire rack over it and put it in an oven at 250˚ to wait for the goodness that is latkes. 
Then I grated the onion.  And then the zucchini.  Careful of the fingers please!

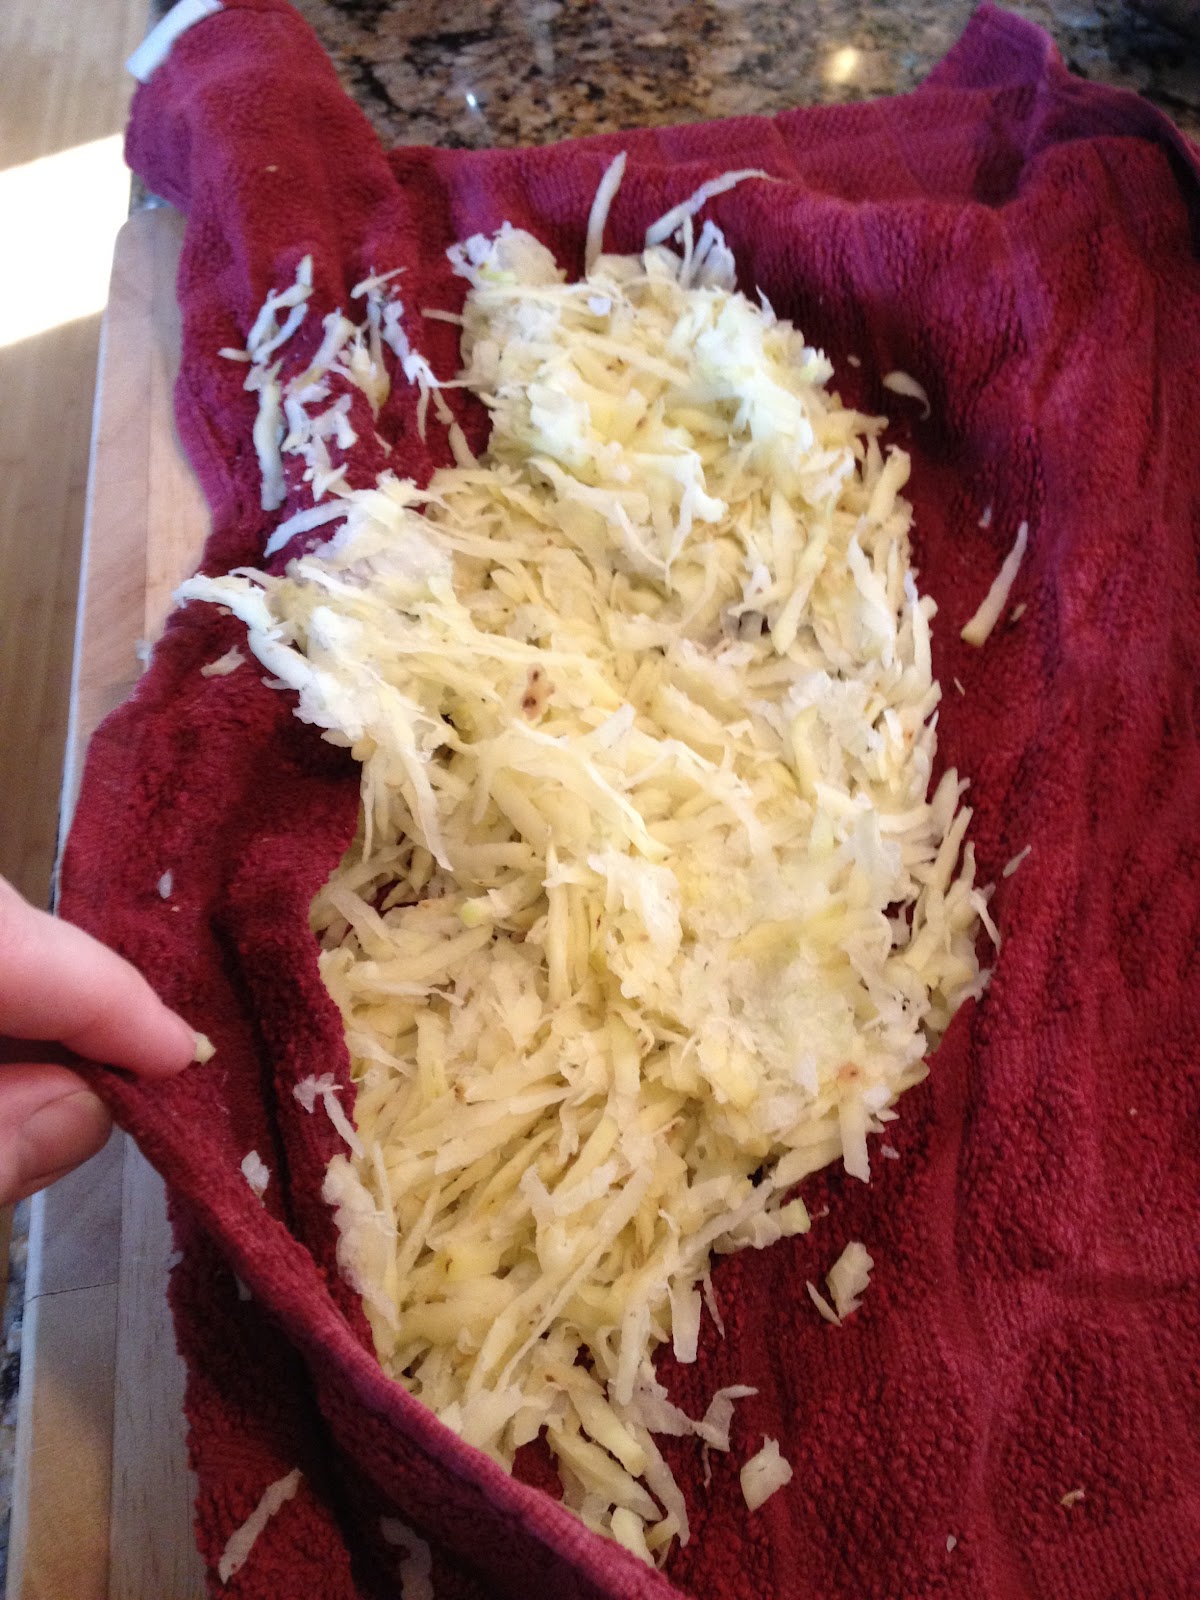
Once all that is done, drain the potatoes and then get out a clean kitchen towel.  This part I did in batches. Spread some of the potato, onion and zucchini mixture on the towel and then roll it up lengthwise and ring it out...hard!

You will not believe the amount of water that comes out!

Once it's rung out put it in a large bowl and continue on with the process...I repeated this step four times until I was done.

Once you have all the drained goods in the bowl, add in the granulated garlic (one of the few times I have used it!) and the beaten egg.  Here's the point where no kitchen tool will work better than a pair of clean hands...just get in there and mix everything up really well.  Then add some salt and pepper and mix it again.  I have a 12 inch saute pan that will fit 4 latkes perfectly, add about 1/4 cup of olive oil and 3 Tblsp of butter (unsalted please, salted butter is gross).

I use a tablespoon and measure out two heaping spoons of the potato mixture.  I then spread them out in the pan with a fork a bit and then leave them alone.

Seriously.  Don't mess with them until they set up and crisp on the first side.  After about 4-5 minutes you can flip them with a spatula and then another few on the second side to get all nice and brown.

Once they are finished please...let them sit on a paper towel for a few minutes to drain out the oil.


While they are draining sprinkle them with a bit of salt and then stick them in a 250 ˚ oven on that cookie sheet/wire rack business.  Works like a charm and will keep them hot without messing with them for about an hour.

Once they are done you can do pretty much anything.  Sour cream or apple sauce are classic here or you can do a spin with lox and chives with some sour cream.  I used mine like I would with a potato hash and served them up with eggs.  They are really a perfect base or side to anything.  Yum!
Bon Appetit...it's time to eat!