Thursday, April 26, 2012

Grilled Stuffed Zucchini

I was having some of my favorites, Bianca and Paula, come over for a "Mama Lunch" today,  and decided I was going to make them my personal taste testers and help me out with this blog.  If you're a Mother I would hope you know what a Mama Lunch is...for those of you who are newly "Mama'd" or not "Mama'd" let me explain.  A Mama Lunch involves alcohol.  Wine.  Beer. Vodka.  Whatever.  We get together for a midday meal, laugh, blow off steam, talk about our kids (or anything but) and have some cocktails.  Don't judge us.  I also do these lunches with non-Mama's and have an equally great time, yet I still call it a Mama Lunch.  I don't like change.  Deal with it.
So this recipe was inspired by an appetizer The Husband and I get from one of our few favorite chain restaurants, Burton's Grill.  It's as copy cat as I can get it and it's amazing if I do say so myself.  It can be an appetizer, side dish or light lunch with a salad.  Love the versatility!  You can feel free to use a jar sauce or your favorite recipe.  If you don't have a favorite, try mine.  It's pretty freaking good My Version of Tomato Sauce, if I do say so myself.
Sadly only Paula was able to make it, one of Bianca's babies ended up being sick.  Poor baby...see why we need Mama Lunches?!?   On the upside...I have another serving sitting in my fridge right now waiting for me to devour it.  Is that wrong?  Yeah, a little bit.  It's just so damn good!


Here's what you need

  • 1 zucchini per person you are feeding
  • Alouette, Garlic and Herb Cheese
  • Sauce, jarred or homemade
  • Mozzarella, shredded, 1/4 cup per dish
First start your grill and get it smoking hot.  I have gotten pretty comfortable with my grill this spring season...not sure why I have been afraid of it until now?  I'm bad ass.  LOL!
You are going to need to cut your zucchini lengthwise, I can usually get 4 good middle slices out of mine.  The ends wind up being my little snacky snack!

I put the slices into a zip top bag and add salt, pepper and a few tablespoons of olive oil.  Zip it up and make sure you take most of the air out then rub the bag in between your hands to spread everything around all nice.  
Lay the slices out all pretty on the grill and shut the cover.  

Leave them alone for 2-3 minutes to get some delicious grill marks on them...I love this part!  Flip them over and do the same thing to the other side.  

Once they are gorgeous and all grill marked put them on a plate or cookie sheet to cool before stuffing them.  

I used a cutting board to assemble mine.  Preheat your oven to 375˚ and add a few tablespoons of sauce to the bottom of your oven proof dishes.  This prevents the zucchini from sticking and later when the zucchini is sitting in your stomach you have something to dip your bread in.  Always think to the future people.  Side note...yes that is a Ziplock bag with my sauce in it, and yes, I label it "Mama's Sauce".  Too funny!

Lay a zucchini slice down and place 1 1/2 teaspoons of the Alouette cheese at the end of the slice.  

Then roll it up in a cute little package.  Ignore the red spots on my fingers...it's permanent marker so you may see it again!  LOL! 

and place it in your oven proof dish...oh happy day!  It looks good already doesn't yet?  Just wait.
I put a few more tablespoons of my sauce on top of the goodness that is the stuffed zucchini

and then pile on the Mozzarella.  Grated Parmesan or Fontina would also be good here.  OMG cheese! It looks insanely good even though the pic is upside down.  I tried fixing it.  And gave up.  

I covered the dishes individually and placed them on a cookie sheet.  It made it easier to get them in and out of the oven.  After 20 minutes check to see if they are bubbly and the cheese is melted.  If you're good to go, leave the foil off and blast them under the broiler for a minute to brown the cheese up a bit.
Mmmmmmm cheesy goodness...that's it!  I'm going back down to the fridge and eating that last serving!  Sorry Bianca!
Bon Appetit...it's time to eat!  Again.

Tuesday, April 24, 2012

Pasta with Beets and Feta

I had moved to the town we are currently residing in almost a year and a half ago.  My first "people" that I bonded with were the librarians at the Public Library.  Nancy runs the children's portion of the library, complete with a crown.  Yes, a crown.  And she deserves it.   She is an avid gardener and was telling me about this recipe she makes for her daughter, Mary, who is Vegetarian.  I was salivating.  She sent me the recipe and when I made it I thought I had died and gone to heaven.  It's another one of those recipes that totally scores because everyone loves it.  Of course the children also love that it turns their pee and poo pink...alright, I happen to find it funny too!  Whatever.
Nancy's original recipe calls for Oranges instead of Clementines, I use whichever I have on hand.  Both ways are delicious.  I also add Arugula to the Beet Greens because #1 I always have Arugula in my fridge and #2 I love greens.  The best part of this recipe is that it is amazing hot, room temp or right out of the fridge.


Here's what you need:
  • 6-8 fresh beets, with greens
  • Clementines, enough for 3/4 cup juice.  I used 10.
  • 1-2 Limes
  • Zest from 3 Clementines and 1/2 lime
  • 1/2 cup Olive Oil
  • 5 Garlic Cloves, minced
  • Arugula, 1 large handful
  • Beet Greens, chopped
  • 1-1 1/2 cups Feta
  • 1 pound of Pasta, your choice

Roasting beets is easy peasy...cut the tops off and the little "tail".  DO NOT peel them.  Just some Olive Oil, Salt and Pepper and a cookie sheet...throw them in a 375˚ oven for about 40 minutes.  A paring knife should easily pierce the beets when they are done.  I also have done this step the night before if I have the oven on anyway...little bit of a time saver for me.  Once the beets are cooled you can peel them very easily. Then cube them and set them aside.
I grab the largest pan I have and add the Olive Oil and chopped garlic.  I know 1/2 cup sounds like a lot but it's going to make the sauce for all of that goodness.  Get the garlic nice and golden...not too much though, overcooked garlic is bitter and nasty.
Once the garlic is smelling good add in the juice from both citrus' and let it reduce for about 10 minutes.  Add in the Beets, Salt and Pepper and let it simmer while your pasta is cooking.  When the pasta is almost done add in the greens to the saute pan with the beets and let them wilt.  It won't take long.
 Drain the pasta (no need to save any of the pasta water this time around.) and put it back in the pot it came from.  Add all the goodness from the saute pan to the pot and mix it well.  I usually add half the Feta at this point and keep the rest for the table for people to add as they see fit.  This post is almost finished so I won't rant about my love for cheese...this time!
Bon Appetit...it's time to eat!

Sunday, April 22, 2012

Quesadilla Night!

So I brought the "babies" to the library last week.  The oldest had her book club meeting and the 2 littles and I  were hanging out chatting it up with one of my librarian friends, Seana.  We always talk about our two favorite things, our children and food.  She lived in Italy for quite some time and let me tell you she is one of my favorite people to talk food with!  So it being a Tuesday and usually my craziest day of the week she asked what we were having for dinner...thankfully I had planned ahead early and had made guacamole...so I could bust out Quesadilla's later!  Let me explain a few things...the first baby (she's almost 10) won't eat Mexican unless there is guacamole.  The middle baby (she's 8) won't eat Mexican without sour cream.  The actual baby (FINE!  She's 5!!!) most times eats them plain or with a bit of sour cream.  Quite frankly, I don't care how they eat them...just that they eat what's put in front of them!


Here's what you need for the Guacamole:

  • 5 Haas Avocado's
  • 1-2 limes (4 Tblsp. juice) and zest of 1
  • 1/4 cup Cilantro
  • 1/2 pint Grape Tomatoes (quartered)
  • 1/2-1 Jalapeno, finely diced
  • 1 small onion (1/3 cup), diced

I start by halving the avocado and then cubing it while it's still in it's "shell"...
Then scoop the fruit out with a spoon...
With the other half take your knife and remove the pit...just chop and twist and it will come right out.
Be careful and use your thumb to "pop" the pit right off the knife...
I try to remove the avocado into the bowl rather quickly so I can add the lime and it doesn't oxidize.  As soon as you're done, squeeze that citrus into the bowl.
I cut my jalapeno length wise first...it's a wee bit blurry but you get the point.  ;-)
Then dice it fine...and yes, that's me with gloves on.  I have gotten "burned" by the pepper before and I NEVER want it to happen again.  Ever.


Chop the rest of the veg and add it...it will take a few minutes to do but, it will be so worth it.  You can make the guacamole earlier in the day and let it sit or not...it's delicious either way.

Here's what you need for the Quesadilla's:


  • Whole Wheat Tortillas (I get the big package at Costco)
  • Mexican Cheese
  • 1 large Onion, chopped
  • 3 Garlic Cloves, chopped
  • 1 teaspoon Chili Powder
  • 1/2 teaspoon Cumin
  • 1 large Sweet Potato, grated
  • 1 can rinsed Black Beans
  • Salt and Pepper
  • 3 large Tblsps of Cilantro...hell just make it 4 Tblsps and then it's just 1/4 cup!
I always start with onion, saute it in some olive oil until it's pretty.  You know what that looks like.  Salt.  Pepper.  Garlic.  Chili Pepper.  Cumin.  It's heavenly.
Add in those sweet, Sweet Potatoes and let them cook down a bit.
Once they are cooked down and caramelized, about 15 minutes, add in the black beans and cilantro.  They don't need to cook, just warm through a bit.
Now let me confess...I love some specialized cooking units...a bread machine, a panini press, an ice cream maker.  My most prized possession is the Quesadilla maker.  I got it from Target, $20.
I always spray the plates with a non-stick spray then lay the tortilla down with a little bit of cheese.
Then some of the filling...
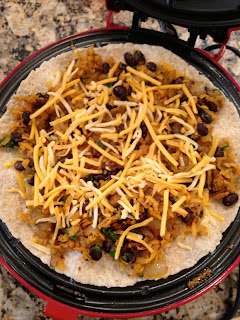
And then some more cheese before the top tortilla.  The cheese acts like a sort of glue so your dinner doesn't fall apart before it hits your face.  It's one of the perfect foods of the world.  ;-)
The little ladies and I like ours with a bit of crunch and color to them...

Like I said before, I always need the guac and the sour cream for everyone to be happy.  I sometimes have a rice salad or a green salad to go along with this meal.  If it's summer time and corn season then grilled corn on the cob is always on deck.  A light side dish is perfect for this meal either way. 
Bon Appetit...it's time to eat!

Tuesday, April 3, 2012

Yukon Gold Latkes with Zucchini

I had spent a leisurely Saturday afternoon working on a blog post for Zucchini Pasta and lost track of time.  Does that ever happen to anyone else?  I glanced at the time and it was 5:20 pm and I hadn't planned anything (so unlike me).  Thankfully I had clicked on the "publish" button and I was geared up for one of those magical moments of pulling something right out of my ass.
I walked into my pantry in a not too obvious panic so as not to alarm the children and find some Yukon Golds.  I thought maybe a hashbrown?  They take longer than I had to brown up and get crispy the way everyone likes.  Balls.  But what if I did a smaller version and made a latke?  I have onions and as a bonus I also have zucchini!  This could work!

My girl friend, Terri, had walked me through making latkes on numerous occasions but I had never made them on my own before.  Who knew that I had retained all that information!  Really all you need as far as tools go for this recipe is a box grater, clean hands and a large saute pan.  Check, check and check!
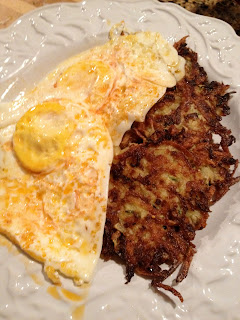
And please don't look at the eggs in this picture, the middle child loves an over hard egg.  Gag.

Here's what you need (food wise):
  • 4 medium sized Yukon Gold potatoes, grated
  • 1 medium sized Onion, grated (Vidalia is what I always have, therefore use)
  • 1 medium sized Zucchini, also grated
  • 2 eggs, beaten (HA!  Not grated!)
  • 1 teaspoon granulated Garlic
I grated all of the potatoes and once they were done put them in a bowl of cold water, it helps to crisp them up at the frying stage.  It also works for French Fries too!

Here's my other trick...get a cookie sheet and cover it with tin foil, then put a wire rack over it and put it in an oven at 250˚ to wait for the goodness that is latkes. 
Then I grated the onion.  And then the zucchini.  Careful of the fingers please!

Once all that is done, drain the potatoes and then get out a clean kitchen towel.  This part I did in batches. Spread some of the potato, onion and zucchini mixture on the towel and then roll it up lengthwise and ring it out...hard!

You will not believe the amount of water that comes out!

Once it's rung out put it in a large bowl and continue on with the process...I repeated this step four times until I was done.

Once you have all the drained goods in the bowl, add in the granulated garlic (one of the few times I have used it!) and the beaten egg.  Here's the point where no kitchen tool will work better than a pair of clean hands...just get in there and mix everything up really well.  Then add some salt and pepper and mix it again.  I have a 12 inch saute pan that will fit 4 latkes perfectly, add about 1/4 cup of olive oil and 3 Tblsp of butter (unsalted please, salted butter is gross).
I use a tablespoon and measure out two heaping spoons of the potato mixture.  I then spread them out in the pan with a fork a bit and then leave them alone.

Seriously.  Don't mess with them until they set up and crisp on the first side.  After about 4-5 minutes you can flip them with a spatula and then another few on the second side to get all nice and brown.

Once they are finished please...let them sit on a paper towel for a few minutes to drain out the oil.


While they are draining sprinkle them with a bit of salt and then stick them in a 250 ˚ oven on that cookie sheet/wire rack business.  Works like a charm and will keep them hot without messing with them for about an hour.

Once they are done you can do pretty much anything.  Sour cream or apple sauce are classic here or you can do a spin with lox and chives with some sour cream.  I used mine like I would with a potato hash and served them up with eggs.  They are really a perfect base or side to anything.  Yum!
Bon Appetit...it's time to eat!